The first two hours of Kakoune in two minutes
Learning a new editor can be a daunting task, especially when coming over from a non-modal editor. I personally started with Emacs, and it took me weeks to be productive when I started using Vim. The modal paradigm is a powerful tool, but picking it up is generally not a painless experience.
When I discovered Kakoune a few years ago, it felt like the jump from Vim to it was even bigger than the one I’d made when transitioning over from Emacs to Vim. Despite the two being fairly close on paper, one still needs to unlearn all the muscle memory patiently cultivated over the years and grow it back up from scratch. If we ignore the fact that in those days the only (comparatively sparse) documentation was centralised in the README file of the project, which might have contributed to why the jump made itself felt so strongly, new comers still have to primarily focus their efforts towards learning the “modal language”, or flavour, of Kakoune.
In order to save them some time, whether they’re disembarking off the Emacs
(non-modal) or Vim (modal) boats, I’ve documented in the following article
some common configuration options. They won’t fit anyone’s workflow exactly
right, I trust the user to tweak the settings how they see fit. They will
however allow turning the two hours it would have taken me to figure out
what lines to write down in my user configuration to get a boilerplate setup
going into two minutes — the time it takes to read this introduction and
save the final
kakrc
onto one’s system.
The configuration file
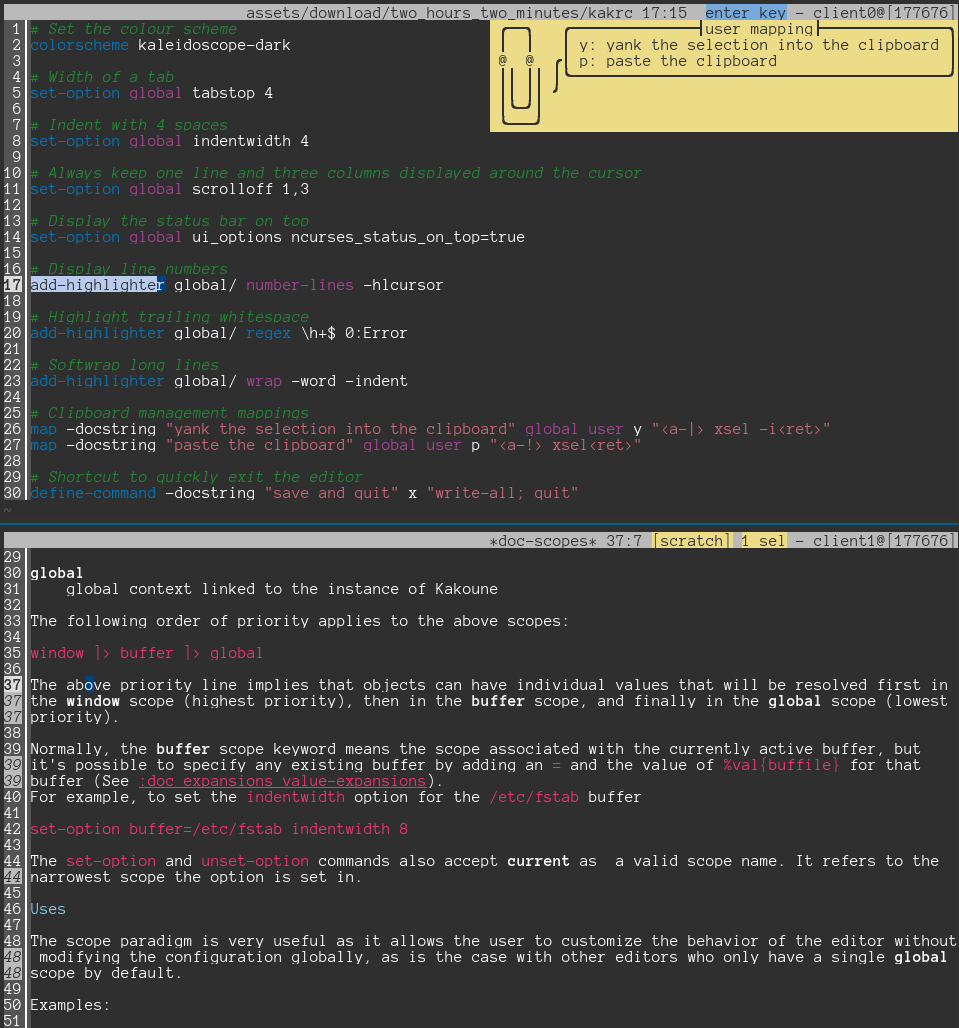
You’ll find below an inlined, commented configuration file to steal from. You
can also
download
it directly, and save it as ~/.config/kak/kakrc (or
$XDG_CONFIG_HOME/kak/kakrc).
# Set the colour scheme
colorscheme kaleidoscope-dark

# Width of a tab
set-option global tabstop 4

# Indent with 4 spaces
set-option global indentwidth 4

# Always keep one line and three columns displayed around the cursor
set-option global scrolloff 1,3

# Display the status bar on top
set-option global ui_options ncurses_status_on_top=true

# Display line numbers
add-highlighter global/ number-lines -hlcursor

# Highlight trailing whitespace
add-highlighter global/ regex \h+$ 0:Error

# Softwrap long lines
add-highlighter global/ wrap -word -indent

# Clipboard management mappings
map -docstring "yank the selection into the clipboard" global user y "<a-|> xsel -i<ret>"
map -docstring "paste the clipboard" global user p "<a-!> xsel<ret>"

# Shortcut to quickly exit the editor
define-command -docstring "save and quit" x "write-all; quit"
Explanations
These explanations expand on the purpose of the lines in the above file,
the salient parts in them, and hopefully give you a bird-eye view of the
various configuration instructions you might recognise in the
kakrc
configurations of more advanced users.
The details are intentionally glossed over and might seem fuzzy, feel free to refer to the list of recommended further readings at the end of this article if you’re curious.
# Set the colour scheme
colorscheme kaleidoscope-dark
The Kaleidoscope colour scheme (also known as theme) is a high-contrast,
colour blind friendly palette of colours that should suit the largest subset
of users, at first. You can go for the dark variant (kaleidoscope-dark)
or the light one (kaleidoscope-light).
If you don’t care either way, comment this line and the default theme will do just fine.
# Width of a tab
set-option global tabstop 4
Options are scoped, which means that they can hold different values depending
on the context in which they’re being used. For general configuration
purposes, use the global scope.
The tabstop option holds the amount of space characters that tabulation
characters (stored in a file opened with Kakoune) will be rendered as.
# Indent with 4 spaces
set-option global indentwidth 4
This option impacts the behaviour of a couple of primitives (a primitive is a “key”, more details about keys/primitives below) that indent or de-indent a line, in normal mode.
In non-modal editors, hitting keys results in the letter associated with them
being inserted into the buffer (the “file”) as-is. In modal editors,
this behaviour applies only to the “insert mode”, which can be entered
by hitting i in normal mode — which is the default mode when starting
Kakoune.
The indentwidth option dictates how many space characters are inserted
or removed when using (respectively) the normal mode primitive > and <.
Note that when editing a file that is recognised by the editor, manual indentation of lines should not be necessary, as that side-effect will be handled automatically upon hitting the return key.
# Always keep one line and three columns displayed around the cursor
set-option global scrolloff 1,3
When scrolling around a large file, the cursor tends to stick to the borders
of the window if more content needs to be displayed. You can have the window
show more context (i.e. lines and characters) when that happens with the
scrolloff option.
The first integer (1 above) in the comma separated pair is the amount of
lines to show above/below the cursor when it hits the top/bottom of the
window, and more lines remain to be displayed in the file.
Similarly, the second integer (3 above) is the amount of characters
displayed on the left/right when the cursor hits the left/right hand
window border.
# Display the status bar on top
set-option global ui_options ncurses_status_on_top=true
Kakoune follows a server/client architecture, and the behaviour of the user
interface (run by the client) can be tweaked via ui_options. It accepts
a list of equal-sign separated key/value pairs, and the above instructs
the NCurses client (default) to display the status bar on top.
Feel free to comment this line if the default behaviour (status bar on the bottom) suits you.
# Display line numbers
add-highlighter global/ number-lines -hlcursor
Highlighters are decorators for the window or the text it contains. Similarly
to options (c.f. above), they are scoped, but we only care about their
global value. You might have noticed however that the above line uses
global/, and you might be tempted to remove it on account of it being
redundant — don’t, the character is significant.
The number-lines highlighter displays a file’s line numbers on the left
hand side of the screen. The -hlcursor flag allows highlighting the number
of the line that the cursor lies on.
# Highlight trailing whitespace
add-highlighter global/ regex \h+$ 0:Error
This line adds a regex highlighter which decorates trailing whitespace
with the built-in Error face. The number refers to the index of the match
within the regex. For instance, 0 refers to the text matched by the regex
(but not to the entire line).
# Softwrap long lines
add-highlighter global/ wrap -word -indent
The wrap highlighter applies “soft wrapping” (e.g. the lines appear
broken up, but no newline characters are inserted into the file itself)
to lines that cannot be fully displayed within the window. The flags passed
to it keep words whole, and the indentation of the lines newly created will
have the same indentation level as their stem.
# Clipboard management mappings
map -docstring "yank the selection into the clipboard" global user y "<a-|> xsel -i<ret>"
map -docstring "paste the clipboard" global user p "<a-!> xsel<ret>"
Mappings (also known as “key bindings”, or more simply “bindings”) allow customising the side effect upon hitting a key. Here is a breakdown of the two lines above:
map: declare a new mapping-docstring "…": document what the side effect of the mapping is — this is optional, but is quite helpful when the mapping is set in theusermode (c.f. below)global: mappings are scoped, just like options and highlightersuser: similar to the insert mode, the user mode is entered by hitting a key (for instance,,) from normal mode (c.f. below for more information)<key> "…": upon hittingkey, execute the given list of primitives
As you can see, quite a few concepts have been packed into merely two instructions.
In terms of functionality, these two mappings copy the current selection
to the clipboard and paste whatever is in it. They’re triggered by hitting
the comma , key followed by respectively y and p.
Read on if you’re not familiar with modal edition, or want to compare the declaration of mappings in Kakoune with other modal editors.
The user mode
Mappings allow overriding the behaviour of a given key, but since they all
have a specific purpose (c.f. primitives below) by default, one would have
to forego whatever functionality the key being overridden provided with,
in order to instantiate a custom mapping.
The user mode is entered from normal mode upon hitting the comma , key,
and allows “user mappings” to be declared within it. It’s a way to address
the above problem: you don’t have to override default keys/primitives,
you can just place them one keystroke away (“behind” the comma , key)
and be free to pick any key you see fit.
Primitives
The difference between “key” and “primitive” is one of semantic, and both can
commonly be used interchangeably.
Keys are referred to as the letter (or symbol, for example the return key) that is printed on them, on a QWERTY keyboard.
Primitives are triggered by single keys or a combination of them, and can be invoked from a prompt (interactively) or script (programmatically). They are referred to using a custom notation that allows combining letters and modifiers (c.f. below).
When placing those cryptic definitions back into the context of the clipboard management mappings above, we get:
<a-|>: holding the alt and pipe|keys together to invoke the<a-|>primitive, which pipes the current selection into a given shell command<a-!>: holding the alt and!keys together to invoke the<a-!>primitive, which inserts the output of a given shell command into the file<ret>: the return key, to validate the prompt opened by the above primitives
Prompt history
You might have noticed that a whitespace lies between the <a-|>/<a-!>
primitives and the shell commands they run:
<a-|> xsel -i<ret><a-!> xsel<ret>
As mentioned previously, these two primitives prompt the user for a shell command, which will be inserted into the prompt’s history upon validation, and suggested back to the user upon a subsequent invocation.
Since our mappings merely rely on the side-effect of the primitives themselves
(i.e. running commands, optionally piping data into them), we don’t want
the associated commands to be inserted into the interactive prompt history,
littering it with potentially multiple calls to xsel.
Mapping recursivity
Mappings execute a series of keys when another is being hit, which might have
left you wondering what would happen if one were to run the following:
map global normal x "x"
Would hitting the x key result in an infinite loop? Psyke!
Mappings can call primitives, but never truly replace them, resulting into
the above statement effectively being a no-op: the x primitive will be
executed upon hitting the x key, which is already the default side effect.
This behaviour allows remapping the keyboard as one sees fit, keeping the series of primitives bound to a key consistent (they don’t depend on the user’s custom mappings).
A popular user configuration instruction is to re-map the key that enters
user mode (also known as “leader”) to the space <space> key. We’ll leave
it as an exercise to the reader to find out how that would be implemented
in a Kakoune configuration. Just be aware that the space primitive is
quite valuable to the editing model, so the comma , and space <space>
keys would have to be swapped (hint: two calls to map).
# Shortcut to quickly exit the editor
define-command -docstring "save and quit" x "write-all; quit"
The x command is ubiquitous in modal editors: it allows saving all files
and quitting.
The define-command command allows executing an arbitrary series of commands
from the prompt (invoked using the colon : primitive). Similarly to map,
a description of the side effects of the custom command can be passed to
-docstring "…". You can read the documentation string of a given command
by typing its name into a prompt (:), it will show up in a popup window
on the main window.
The above command definition is thus quite straight-forward: declare a new
command x which calls write-all and quit. These last two commands
are built-in, and unsurprisingly respectively save all open files, and quit
the editor.
Further readings
I hope this introduction will be useful to new comers who want to get started quickly. However, we’ve barely scratched the surface of the concepts explained above, let alone what was not mentioned at all. If you want to learn more, feel to check out the following documents:
- the community wiki: hosted on Github for the time being, the community wiki is a collection of topics, snippets, tips added by experimented users
- the on-board documentation covers the topics glossed over in the above
explanations, you can read more about them using the
doccommand (for example,:doc scopes<ret>) or by reading the Asciidoc formatted files directly on Github:
If you have comments or questions, feel free to drop by the official IRC channel: #kakoune @ FreeNode.